Thursday, June 16, 2016

Past Gifts

I really have to get better at updating this else there is no point. This post will cover one woodworking projects I made last year.

The first was a pair of shot glasses. These were as a valentines day gift. These weren't just any shot glasses, theses ones were made from a billet of coloring pencil.

I got the idea from seeing some pics online of both a ring made out of coloring pencils and also a vase made from them. I'd previously seen shot glasses made of a wood/Epoxy combo at the Renaissance Faire in Bristol,WI where one of the vendors had taken scrap pieces of wood, joined them with epoxy and turned them down.

I started by buying two boxes of pencils and arranged them into a hex shaped billet. I made a foam form to hold them while I epoxied them layer by layer. Using a Smooth-On epoxy, I slathered it on each pencil and assembled them into sheets which I then stacked into the hex billet. Once the billet was formed, I wrapped elastic bands around each end of the billet to hold it in shape. Putting it on end, I tamped down the pencils so that the base was flat. I made a collar around the tips of the pencils and poured in the remaining epoxy to fill in the gaps. Gaps were present cause I could only find round pencils rather than hex shaped pencils. After pouring in the epoxy I left it to set overnight.


Unfortunately those gaps meant epoxy bled out from the base so the billet had a nice big brim of epoxy. This necessitated a second filling. I noticed that some bubbles had been trapped in the first cure so after pouring the epoxy into the top of the billet I put it in a vacuum chamber to draw out the bubbles. That seemed to help.

I chucked the billet in the lathe and faced of the pencil tip. I couldn't tighten the chuck too much for fear of cracking the billet. After facing, I knocked the edges off the billet to get a round billet. I set the compound slide to to around 15 degrees to get the desired taper. I left it like this for the remainder of the project. I drilled out the billet carefully to open up enough space for a small boring bar. After boring out the internal shape to leave a 10mm wall I started tapering the outside. While still in the lathe. I sanded down the outside of the shot glass with varying levels of sand paper. I wrapped a dowel with sandpaper to sand down the inside of the shot glass.


I removed the billet from the lathe and removed the shot glass with a handsaw. I left a small plinth so that the shot glass could be rechucked for finishing later. I then repeated the process for the second shot glass. I grabbed some Acrylic based varnish to finish the shot glass. This filled some of the bubbles that were left trapped in the epoxy. I also poured some extra varnish in the bottom of the shot glass to make sure the glass was watertight. After each coat, I put the shot glass back in the lathe and sanded them down. I did this for the first two or three passes before removing the plinth.


 A quick sanding of the base and a few coats of varnish and it was the same level of varnish as the sides/inside. I went and added another 3-4 layers of varnish so that the shot glass was fully sealed and would remain so even when used.

Wednesday, March 18, 2015

Battle Bots, Part 2!!

Better late then never!!

So, the two weeks leading up to Motorama was a hectic time with the Boston weather making the trip to MITERS more of the trek than normal. No bike and flaky T service makes for a long (cold) haul home in the evenings. Traveling for work also limited my time.

Anyway, back to robots! After breaking the old armor I rolled back the design iterations to make the armor piece with a solid base plate. I'd initially planned to use steel (heavy)for the armor but since I was using aluminium, I could use more adn thus make the the armor and base piece one single piece.

This part was cut in the IDC on the ShopBot as before. The piece was annealed and all the bends were made with the DIY die press I made. Fixtures from some crufed lab equipment had a nice long 90 degree channel at 45 degrees. This piece was placed on the bed of the small arbor press while an short section of square Al stock had a slot milled in it across the diagonal to fit snugly onto the shaft of the arbor press. The die press worked an absolute charm, giving very clean bend lines and a great deal of control over the final bend angle.

The front flipper is mounted to a support rib that also braced the Al armor. My first iteration suffered skewed holes thanks to me forgetting that the drill chuck is significantly greater than the diameter of the drill bit..oops. I remade this piece with a removable flipper mount so that the it could be drilled out correctly then installed in the rib. This worked a charm in the end. The flipper itself consists of two pieces, a spring steel plate with a lip mounded onto a .25"Al plate which connects to the rib and the drive servo. Stainless steel pins were used in in the hinges and secured by over shadowing the holes with button head screws. The spring steel was first annealed where it needed to be bent till it was cherry red, and was kept there for a few minutes to make sure it was annealed fully. I bent the lip using a vice. The steel was bolted onto the Al with a handful of M3 button heads.

With the front rib complete, I could begin the process of securing the battery. The battery was secured against on of the motor supports with a block of delrin and bounded vertically by the front rib. The flipper drive servo is also mounted to the base with two small delrin blocks. The linkage arm from the servo is simply a short piece of Al.

The initial plan was to make a sort of composite armor with some water jetted spring steel plates epoxied to the Al frame. Due to a series of calamitous events, the waterjets that we'd access around the MIT campus were all down the weekend before Motorama and part of that last week.Cue a new solution. I knew Charles had made Colsonbot and after Jamo showed me a few video's from lasts years Moto, I reckoned encasing the bot in some colsons would dramatically increase the survivability of the bot. Since we didn't happen to have an 8" colson on hand, I butchered a 6" colson to make 4 bumpers that would absorb/divert any impacts. The thickness of the colsons also meant that they served double duty by protecting the wheels. To mount the colsons to the Al, three self tapping torx screws were driven into each bumper after a liberal coating of E600 was applied to both contacting surfaces.

The last thing to do was to fit the top armor to the bot along with the rear rib. This took a bit of tweaking with the benchtop sander to get things just right. After the final assembly I weighed the bot. 1382g. So around 20g over the limit (1362g). Pretty damn good for just winging the whole armor but. The final Solidworks weight was around 900g. The rear rib was made of 3/8" Al since it's what I grabbed first. Taking this down to .25" with the mill knocked off around 50g since the final weight was 1330g.

I should probably point out that I finished the bot around 2 hours before our scheduled departure time, so I'll count that as an finishing early..... Once i was all packed and ready to go, I went upstairs to help Dane and Bercu with their bot.


Yeah yeah, I'll add pics soon. Due to the time press, I got super lazy about photographing some of the construction phases.


Wednesday, February 4, 2015

Battle bots, Part 1!!

So, Motorama is coming up at the end of February and with a crew of Miters personnel going along, I decided I'd head too. Charles suggested that I make a bot for the competition rather than just spectate so i set off on designing a small battle bot!
Despite his and Danes protestations, I decided to keep it small and go with a beetle bot class robot (3 lb) rather than a 25-30 lb bot which they'd be bringing. This was because its cheaper, much easier to transport and less likely to get pummeled and flittered by an inverted lawnmower.
This isn't the first small bot I've made. As a junior back home, I made a mini sumo bot (500g) that actually won the national mini sumo competition that year. The front armor was stainless steel obtained from my dads school who's shape was based on a cardboard mock-up I'd made. 3 ultrasonic rangefinders mounted atop top the front armor provided the heading for the opponent while 2 50:1 or 100:1 micro gear motors provided the drive. A homemade Arduino PCB containing a H-bridge and sensor headers was made and that's about it for the mini-sumo bot. The scoop at the front was a surplus membership card to the Engineering Soc on campus, bent, sharpened and taped to the front, which was given to us by the chap we beat in the final. Needless to say, he was not a happy camper.

Anyway, back to the beetle bot. Soon after deciding to actually build a beetle bot, Charles was in Shenzhen and managed to snag a boatload of gearmotors for next to nothing. In return for some Beantown Taqueria, he gave me 2 25mm gear motors with an output speed of 1200 rpm. With these motors in mind I got some grippy wheels and spares from Robot marketplace. I could have gone with a smaller radius wheel for more torque but I calculated that the larger wheels would be borderline acceptable and fine if I got under any opponent. A Hydra ESC/motor controller was also purchased which has 3 channels (5A cont, 8A peak) and offers mixing. To round out my purchases, I grabbed a RC transmitter/receiver combo, two batteries (2S1P 1Ah) and a hi-torque servo from Hobbyking.

With my electronis selected, it was down to the mechanical/weapon design/selection. I was warned on the onset "Don't be a derp and make a wedge" so I needed some form of active weaponry. Initially I was swinging between a flipper design and a captive bolt/harpoon design. I'd worked out how to reload the harpoon with a third motor to be controlled by the third channel of the Hydra using a mechanism similar to how an electric airsoft gun works. I soon realized however that every time I'd use the weapon, it'd propel me backwards at decent pace and need massive internal support to prevent it nuking my own bot. There was also the slight concern that the captive bolt mightn't stay so captive, which the Motorama people and spectators in general may not enjoy so much. A flipper it was then!!

I decided to make the entire body out of folded sheet metal, namely 6061 or some steel sheet. The choice of folded sheet metal was an opportunity to try out the sheet metal functionality of Solidworks which I've recently stated messing with. In fairly short order, I'd a rough body designed that could house the motors and electronics. The flipper would sit front and center in a wedge shaped body which could still be effective even if the servo is knocked out. Aluminium ribs would strengthen then folded metal and provide and anchor point for the flipper. The top armor is removable to allow easy access to the electronics within. I toyed with making the shell out of steel but it increased the weight excessively so I removed part of the base and replaced it with and Al piece to save some weight. In the end I swapped back to aluminium for ease of manufacture.
CAD of the Bot
                             
The pieces were cut on the Shopbot in the IDC by Charles. Unfortunately, someone had screwed with the setting leading to some terrifyingly fast cutting of the sheet with pretty much friction stirred welded the aluminium out of the way, jamming the end mill in record time.
Friction stir welded edges...

How it should have looked on top.

A 1/16"drill but was also busted trying toe mill slots for bending. After a double checking all the settings, the final piece was cut out with a significantly less gnarly edge.

Down in MITERS I began to bend the shell into shape using some some Al blocks from an old laser, a propane torch ( anneal the Al to prevent cracking) and a hammer. After heating/annealing all of the bend lines, I bent the shell into shape.
 After each 45 degree of bend, I'd run the torch over it again to try anneal the part. This actually seem to work......
Spoke too soon...


Well it worked for most of the shell. I messed up by placing a mounting hole in the corner of the narrow lip leaving the very little metal and repeated bending and straightening caused the metal to eventually fail. Since I'd already folded 90% of the body at this stage, I decided to keep going and just mount the separate to the bottom plate. This actually worked quite well in the end but i'll probably remake the base shell taking into account some of the things I learned. I had motor mounts printed but due to some slight warping in the shell, they didn't quite fit so I just removed them and mounted the motors directly to the shell with no additional support.

The first flight!! Wires, wires everywhere!!
I crammed the electronics into the shell and took the bot for a quick spin around MITERS and the IDC. The steering is super sensitive but with some more practice I'll be fine with it. Quick video below of the inaugural spin around.

 And finally, some extra pictures I didn't manage to fit into the main body.

Top armor attached to one of the Al ribs.
The base shell piece. The small uncut areas are intentional and are used to prevent movement of the work piece while it's still being cut.
The three cut pieces after the edges had been treated.
Busted 1/16" endmill.


Sunday, January 4, 2015

Prosthetic Hand Electrical Design

So, for the electrical design, I had a number of design points to follow.

  • 5 Motor driver channels
  • 2 EMG channels
  • 5 Servo headers for tactile feedback
  • 2 servo headers for thumb and wrist movement.
  • Battery level display/clock face with RTC IC.
My supervisor had a license for Proteus PCB design tool so for the project I used it's design tool. To make this project properly available, I need to port the design over to Eagle or a similar open platform.

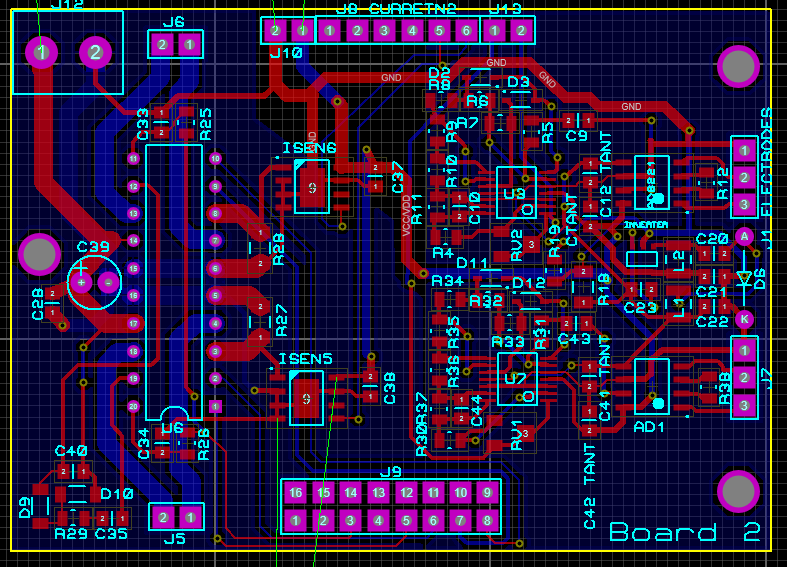
Due to the size/volume limits within the arm, I decided to go with a 4 stacked 2 layer boards. The top board is simply the display board and RTC circuit. For the display, i went with a clock face layout with 12 RGB LED's. The LED's I chose are those found in the Neopixel products from Adafruit. These addressable LEDs need only power ground and a single data in as they are daisy chained together. A 13th LED acts as a temperature sensor. The top corner of the PCB contains the RTC IC and crystal. The reverse side has the backup battery. A 6 pin header (Vcc, Gnd, LED, SCL, SDA, SW) connects the display to the next board.

The next board is the microcontroller board. I went with an ATMega 2560 for simplicity of programming since I was already familiar with the Arduino IDE. I started by copying necessary parts of the Arduino Mega 2560 schematic into the Proteus sorfware. After the ICSP and filtering had been sorted I broke out all the necessary pins. I went with a single row of headers along the top side of the board for all the ADC channels on the ATMega. 10 are needed but since there are 14 total, i decided to break them all out. Along the bottom edge of the board I put a double row of headers for all the drive control signals. Each channel takes two signals and an enable line is shared between each pair of channels. This makes 12 PWM control channels ( 6 channels) and 3 enable lines so a 8x2 header. 7 servo headers were placed along the right border of the board along with some large electrolytic caps. Finally, 8 GPIO pins were broken out on the board for any additional peripherals I could think of. A divider circuit to the controller board for battery level monitoring was also added. In hindsight, I should have placed a power-on led and general indicator LEDs on this board, along with a 5 pin header for a USB to FTDI dongle.

The next layer down contains one driver IC and the two EMG sensors. The EMG sensors are based on the EMG sensors of Advancer Technologies with the addition of a -5v supply to create a bipolar supply for the amps. A 5 pin header is used to connect to the electrodes ( 1 GND and 2 per channel) The 2 filtered, rectified and amplified signals are passed the the ADC header along the top edge of the board. The driver IC I chose is the L6205 by STMicroelectronics which is a dual channel full bridge driver capable of 2A per channel. Stall current for the chosen motors is 2.1A. I replicated the test circuit that's in the datasheet, including the bootstrap circuit. I added low side current shunts to the ground path of each driver with a fixed gain Allegro current amplifier. With this circuit drawn, it was just a  case of copy and paste for the bottom board.


The PCB were manufactured by Seeedstudio and I had them back in hand within 10 days, which was great. Assembly was straightforward and everything was working fine except the EMG. after some probing with a multimeter and poring over the schematic, I realized that first of all, the -5v converter was going nuts and secondly, i'd grounded the -5v inputs on the op-amps meaning they weren't receiving the -5v supply. I tried fixing the issue with some angle wires and trace cutting but it still didn't work. I think with all the desoldering and resoldering damaged the traces beyond repair. With time running out, I bought a second dev board from Advancer (Had one for prototyping) and placed both of them under in the PCB with a separate -5V battery.
Boards back from Seeedstudio


Next part i'll cover the final assembly and include some test footage.


Monday, December 29, 2014

Catch up time!!

So, now that I've some time over Christmas break, I should start filling this blog up with my projects from the last few years and from my time in Boston so far!

First project is my masters thesis project.

For my masters thesis, I designed and manufactured a prosthetic hand that could be controlled by the residual muscles of the forearm. Why? Well currently there are commercially available hands that retail for in excess of $15,000 to give someone a hand that functions in a relatively realistic manner. This to me seemed like  rather steep price so I wanted to see if it was possible to make a prosthetic hand with similar functionality to the commercial ones, but for less than $1,000. My hand would not be as polished as the commercial ones but would at least feature a similar control methodology with an anatomically similar hand with individually controllable fingers and various grip patterns. CAD files and design files are available here.

The project consisted of two main chunks, the mechanical hand and the control electronics. For the hand, I was going the 3d print the hand on my reprap for the easy, flexibility and speed of prototyping. For the electronics, I was going to need some EMG sensors to read the muscle activity, a microcontroller for all the control and then some bidirectional motor drivers for the output. I also decided to incorporate force feedback for tactile feedback. Instead of force sensors, I decided to use current feedback to give me approximate force data. My design splurge on the hand was to include a clock face of RBG led's on the wrist to act as a watch but also a battery level monitor.

For the mechanical, I started with the design of the finger and worked back from there. I took some measurements of my hand and digits and averaged my index, ring and middle to make an "average finger". I wanted to use and average finger so that I could just copy and paste once I got one finger designed. I decided to use a capstan system which extends and flexes the finger. I used a stainless steel nylon coated wire from (link), motors from fingertech (link) and a tensioner mechanism to keep the wire from slipping on the capstan. This capstan system is similar to the one used in the open hand project though it was developed independently. It also allowed for a reduced number of spares. The shape of the fingers was quickly defined so the only thing that had to be done was find the correct internal profile to make the finger curl in the right manner (Start proximally to the palm then move distally). This took a number of iterations to get the correct as many of the initial profiles led to the distal segment curling first and moving inward. Anyway, after a number or prototypes I got it working satisfactorily.

Next I designed the palm to have an anatomical shape. The fingers were splayed by degrees and offset to match the anatomy of my hand. Small clips and nubs are used the limit any motion. The palm consists of two plates, one which holds the four fingers while the second acts as the palm and is the mount for the thumb. The thumb can adduct and abduct thanks to a servo mounted in the palm. The thumb itself is a modified finger, just being slightly wider than then the other fingers and a section shorter. 

The stump mount or sock is based on an article I'd seen here where old plastic bottles were thermoformed around a model of the stump. These socks are only suited for light to medium duty but that should be sufficient for the duty it would see. To mount the bottle to the hand, I made a split adapter that bolts together with 4 M4 bolts. One side interfaces with the bottle, the other with the PCB's.

The last part of the mechanical design was the wrist.Initially I wanted to have this joint actuated but due to limited time, I had to got with a fixed position wrist. The orientation can be changed by removing a M3 bolt and rotating it to one of 8 locating holes. A central M8 bolt acts to transfer forces through the wrist joint.


Tuesday, October 7, 2014

So yay, I now have a blog. However, I've work in the morning so I should probably get some sleep and work out all this in the AM......

List of up coming projects/write ups:

    • Masters thesis: Prosthetic hand with EMG control
    • Metric scooter
    • The Annals of the Atomic Chibi Jeep/Thing
    • Kossel XL printer
    • Travel/Foldey Kart or whatever I end up calling it.
    • Whatever else I end up building.